最近接到一个任务,需要为系统开发一个安装包。我们的项目包含一个pg数据库,两个dotnetcore站点,一个桌面应用程序。大家知道,在windows平台上部署站点时,需要很多繁琐的手动操作,比如开启IIS,部署应用,修改配置,修改环境变量等等。但在给客户部署演示系统时,就显得很低效,需要实施过去帮忙,很多客户都是没有能力独自完成部署,因此就有了傻瓜式安装包的需求。
之前这些工作都是手动操作,虽然我写了一些脚本将一些操作自动化,但还是有些工作是bat脚本无法胜任的。当然有一些例如innosetup之类的打包工具,但实际上它们的工作配置也通过脚本来完成,或许能全部满足我的需求。那为什么我甚至连调研是否可行都没有,而选择自己去开发一个安装器呢?这里我有一点私心,因为这些打包工具都有一些年代了,界面跟不上时代。作为一个新系统,在产品上就应该去争这些细节,所以我选择做一个类似于vs2017安装器的一个东西,灵感也是来自于vs2017安装器。
技术上我参考vs2017安装器,采用electron+nodejs+angular的组合,除去界面,一个站点的安装流程需要做如下工作:
- 解压
- 安装数据库
- 设置环境变量
- 安装运行环境
- 开启iis功能
- 部署站点
- 修改配置文件(ip,图片文件夹等)
- 修改站点ip
- 安装注册表
以上就是一个安装步骤的核心内容,可以看出,以上全部做到不进行任何手动操作还是有一定挑战性的,这里大量使用了windows的cmd命令,顺便感谢一下msdn的文档,真的非常全。这里我详细介绍一些这些步骤的开发思路及历程。
解压
解压使用了nodejs的unzipper包,没什么可说的,按照readme操作就行了。这里要提一下系统压缩包的存放位置,在开发时,我将压缩包放在项目根目录,编译后放到运行路径的根目录。但实际上在查找时的方式是不同的。开发时,可以通过electronremote.app.getAppPath()获得,但打包后,remote.app.getAppPath()将会获得resouce/electron.asar的目录,这时通过remote.app.getPath('exe')可以直接获得运行目录。
安装数据库
系统采用的postgresql数据库,作为最先进的数据库,有一个优势:提供了命令工具直接完成安装工作。当然mysql的biniary包可能也有,我没有研究过。SqlServer就不要想了。
参考代码:1
2
3
4
5
6
7
8
9await this.execCommand(`${binPath}\\initdb -U postgres -D "${dataPath}" --encoding=utf8 --locale=C`);
await this.execCommand(`${binPath}\\pg_ctl register -D "${dataPath}" -N AcartonsPostgreSQL`);
await this.execCommand(`copy /y ${serverFolderPath}\\postgresql.conf ${dataPath}`);
await this.execCommand(`copy /y ${serverFolderPath}\\pg_hba.conf ${dataPath}`);
await this.execCommand(`net start AcartonsPostgreSQL`);
await this.execCommand(`${binPath}\\createdb -h 127.0.0.1 -p 5433 -E UTF8 -U postgres acartons_parking`);
await this.execCommand(`${binPath}\\pg_restore -h 127.0.0.1 -p 5433 -C -c -d postgres -U postgres ${serverFolderPath}\\db.dump`);
// tslint:disable-next-line:max-line-length
await this.execCommand(`${binPath}\\psql -h 127.0.0.1 -p 5433 -U postgres -c "alter user postgres with password 'postgres';" acartons_parking`);
从上到下命令含义为:初始化数据库、安装数据库服务、复制预定义的配置文件、启动数据库服务、创建数据库、还原预定义的表结构、修改密码。
this.execCommand是我根据node模块child_process.exec封装的方法,这里有个trick,我后面再讲。
设置环境变量PATH
这一步骤需要将postgresql的bin目录添加到环境变量Path中,花了我很多时间,起初我搜到的方案是使用setx命令,但是setx命令有个局限性,最大只能有1024个字符,超出部分会被截断丢失,这显然是不行的。
接着我搜索得知,windows环境变量保存再注册表键HKLM\SYSTEM\CurrentControlSet\Control\Session Manager\Environment中,于是我尝试使用win32 api直接改注册表。实际操作过程中,发现需要使用node-gyp编译原生模块,而要让node-gyp工作,在windows上需要c++ vsbuild环境,费了很大力气终于成功,但是使用electron-rebuild编译时又出现了问题,于是我想,就算解决了,以后换个环境,或者其他人维护这个项目,又得浪费一番时间,于是我放弃了继续研究。
接着我想,node调用win32 api很难,那我用C或C#开发个exe命令行程序是不是可行呢?再接着想,是不是有现成的命令来修改注册表?于是找到了reg命令,具体参考msdn,reg命令提供了丰富的注册表操作,参考代码:1
2
3
4
5
6
7
8
9
10let pathValue = await this.execCommand('REG QUERY "HKLM\\SYSTEM\\CurrentControlSet\\Control\\Session Manager\\Environment" /v "path"');
pathValue = pathValue.split(' ')[3].replace(/(?:\r\n|\r|\n)/g, '');
if (pathValue && pathValue[pathValue.length - 1] !== ';') {
pathValue += ';';
}
if (!pathValue.includes(this.eleService.path.join(serverFolderPath, 'pgsql', 'bin'))) {
pathValue += (this.eleService.path.join(serverFolderPath, 'pgsql', 'bin') + ';');
// tslint:disable-next-line:max-line-length
await this.execCommand(`reg add "HKLM\\SYSTEM\\CurrentControlSet\\Control\\Session Manager\\Environment" /f /v "Path" /t REG_EXPAND_SZ /d "${pathValue}"`);
}
代码中可以发现,我对注册表查询结果做了一些字符串截取,因为命令返回结果包含了一些不必要的字符,大家尝试调用以下就明白了。
安装运行环境
运行dotnetcore程序需要安装一些必备库,平时我们都是通过下载并运行安装包,点击下一步完成安装,但实际上这些库都可以通过调用命令start /wait [appName] /S静默安装,实际测试感觉还比手动安装快。参考代码:1
2
3
4
5
6
7
8
9
10
11
12
13
14
15let cmd = 'start /wait ' + this.eleService.path.join(serverFolderPath, 'sdk', 'vcredist_x64.exe') + ' /S';
await this.execCommand(cmd);
const glob = window.require('glob');
const hostfiles = glob.sync(this.eleService.path.join(serverFolderPath, 'sdk', 'dotnet-hosting*(-2.1.0-win).exe'), { nodir: true });
if (hostfiles.length === 0) {
this.disableServerInstall = true;
this.notification.warning('安装组件缺失',
'未找到aspnetcore-host组件', { nzDuration: 10000 });
return;
} else {
cmd = 'start /wait ' + hostfiles[0] + ' /S';
await this.execCommand(cmd);
}
开启iis功能
开启IIS功能,平时我们都是在控制面板程序和功能进行,那么这里也有一个命令可以安装:DIAM。参考代码:1
2
3
4
5
6
7
8
9
10
11
12
13
14
15
16
17
18
19
20
21
22
23
24
25
26
27
28
29
30
31
32let cmd = 'DISM /Online ';
const args = ['/Enable-Feature',
'/FeatureName:IIS-ApplicationDevelopment',
'/FeatureName:IIS-ASPNET /FeatureName:IIS-BasicAuthentication',
'/FeatureName:IIS-ClientCertificateMappingAuthentication',
'/FeatureName:IIS-CommonHttpFeatures',
'/FeatureName:IIS-CustomLogging',
'/FeatureName:IIS-DefaultDocument',
'/FeatureName:IIS-DigestAuthentication',
'/FeatureName:IIS-DirectoryBrowsing',
'/FeatureName:IIS-HealthAndDiagnostics',
'/FeatureName:IIS-HostableWebCore',
'/FeatureName:IIS-HttpCompressionDynamic',
'/FeatureName:IIS-HttpCompressionStatic',
'/FeatureName:IIS-HttpErrors',
'/FeatureName:IIS-HttpLogging',
'/FeatureName:IIS-HttpRedirect',
'/FeatureName:IIS-HttpTracing',
'/FeatureName:IIS-IISCertificateMappingAuthentication',
'/FeatureName:IIS-IPSecurity',
'/FeatureName:IIS-LoggingLibraries',
'/FeatureName:IIS-ManagementService',
'/FeatureName:IIS-Performance',
'/FeatureName:IIS-RequestFiltering',
'/FeatureName:IIS-RequestMonitor',
'/FeatureName:IIS-Security',
'/FeatureName:IIS-ServerSideIncludes',
'/FeatureName:IIS-StaticContent',
'/FeatureName:IIS-WebServer',
'/FeatureName:IIS-WebServerManagementTools'];
cmd += args.join(' ');
await this.execCommand(cmd);
修改配置文件(ip,图片文件夹等)
站点release程序中需要根据实际情况修改配置,巧的是dotnetcore的配置文件正好是json文件,nodejs读取文件转成json改一个属性再写回去,相当方便,就不贴代码了。
部署站点
到这里,我不得不佩服windows命令的完善程度,部署站点,无非是创建应用程序池,创建站点,然后修改一下配置,使用AppCmd命令,具体请参考msdn,参考代码:
1 | const apiPath = this.eleService.path.join(serverFolderPath, 'api'); |
以上代码没有修改站点绑定的ip,是由于我细节上还没开发完,大家注意一下就可以了。
安装注册表
我们在安装软件后,再次打开安装器,需要判断系统是否已经安装,同时,在控制面板的程序和功能中,需要有所体现,并且让用户选择卸载。这些信息也是配置在注册表中的,其中涉及到两个注册表项,HKLM\Software\[AppName]与HKLM\Software\Microsoft\Windows\CurrentVersion\Uninstall\[app name],前面已经介绍了注册表的操作,这里就不再贴代码了。
关于angular与node模块
在使用angular的过程中,发现了一个问题。当我们在node模块方法的事件或者回调中修改Component属性时,发现虽然属性实际值改变了,但由于闭包作用域的改变,页面绑定的内容并没有发生修改。这时就需要把属性赋值放到回调方法或者事件之外进行,需要把异步方法转成同步,同时呢,又不能卡住界面。这里利用async/await语法配合Promise做了一个骚操作,我前面有提到,当然,异步转同步不止这一个办法,但其他方法很容易就会造成阻塞,卡住界面。展示代码如下:
1 | private async execCommand(cmd: string) { |
其中循环中的sleep操作设定的延时,我设置了1s,大家可以根据实际情况的预判,适当进行调整。
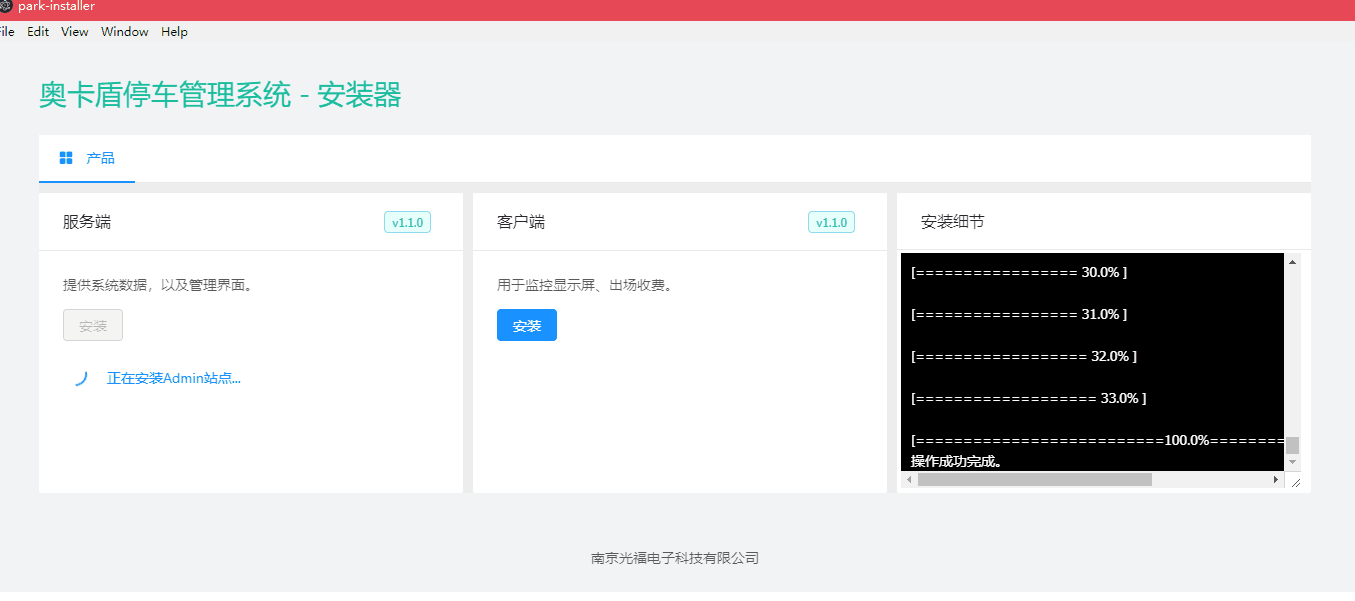
界面展示
最后贴一下界面展示成果